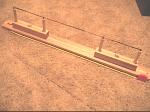
After decades of making both Flemish and endless style strings, I find I prefer endless. I believe they are easier to make, easier to duplicate, more consistent during usage and so are more accurate. There's a reason why 99.99% of all Olympic archers prefer an endless string. The multi colored look of the Flemish can be accomplished with an endless string, by simply dividing the number of strands by the number of colors you want to use, and spin each color separately.
- Endless Jig
- The very simple 2-arm jig in the pictures can be bought for about $30, but you could surely make your own. There are lots of different styles of endless jigs but all perform the same basic operation.- Server
- Required to serve the string loops and center serving.- String Fiber
- Remember, if you're looking to make a string for an older bow, or one not able to hand ultra low stretch fibers, stick with B-50, B500, Penn66 or B-75.- Loop Serving Thread
- #4 multi fiber nylon has been a mainstay for serving string loops.- Center Serving Thread
- #4 nylon, #62 braid, mono, etc.- String Wax
- A beeswax formula is preferred over synthetics by most string makers.- Knife or Scissor
- For cutting fiber or serving thread - must be SHARP.
- The string jig used for this tutorial is actually one half of the actual jig itself. This was done in order to make capturing images easier.
- The actual string length made in this demonstration is 27-1/2" from loop-to-loop, comprised of 10 strands of B-50 dacron. The serving material is #4 multi nylon.
- You should choose an EVEN number of strands for the string you're making.
- Each image will enlarge when mouse clicked.
- There is more than one way to build an endless string - this is my process!
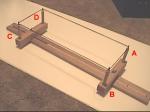
If you already have a string you wish to duplicate, simply place it on the string jig as shown in the image below. Make sure that: the string has little or no twist, and that you apply tension to the string before locking down both arms of the string jig, then remove the string. If you don't have a string, but know the string loop-to-loop length, set and lock down the arms to that exact length, measuring from the outer ends of the outer most post of each arm.

When the jig arms have been tightened down at the appropriate length for your string, tie on your string fiber to post "A".
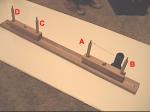
Begin the "spinning" process by wrapping the strand around post "B", keeping a good tension on the strands (not limp and not "banjo" tight)....
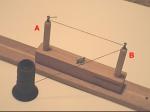
...then all the way down to post"D", around it and...
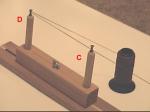
...all the way back to post "B". This completes TWO strands of your string. Continue "spinning" the strands 'til you've reached your total even strand number.
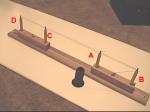
When you've completed your last strand, and have turned around post "B" for the last time...
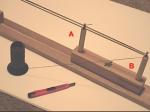
...cut the strand about 6" to 8" past post "B", then tie off the strand end to post "B", keeping the strand tight with good tension.
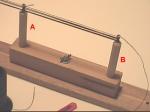
Next, begin twisting both arms: swing post "A" out and post "C" out exactly as shown in the image below.
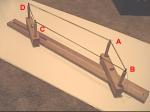
End up with both arms parallel to each other as shown below. Make SURE there's good tension on all strands - if not, loosen up the jig length adjustment a LITTLE, pull the arms tight, re-tighten the jig.
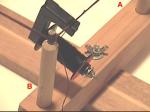
Begin serving the first string loop on the post "A/B" arm. You want the serving length to be about 5" long.
Whip the end of the 5" long string loop serving.
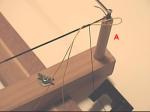
When the first string loop serving is completed (always starting with the post "A/B" arm) CAREFULLY clip off the strand you first tied onto post "A" and then the one tied to post "B". The serving tension is holding the entire string together in an "endless loop". Now serve the other string loop (post "D/C" arm) the same way (correct! - there are no tied strands to cut on this arm)!
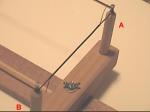
Now fold the arms back the way they were at the very start of making the string...
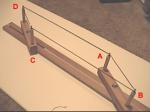
...with the arms pointing at each other.
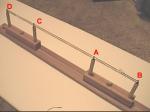
Now that the arms are back, take tension off the string, and rotate the string so that the string loop serving wraps around the outer string posts, "B" and "D". Re-apply tension to the string. You want the serving ends to be staggered, as shown below (note the tied ends we just cut on posts "A" and "B").
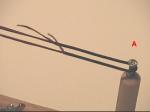
Serve both of the string loops closed. Here's a reference for the loop lengths for recurves and longbows (these are the distances from the end of the string loops that you begin the close loop serving):Also: length of string loop serving: 5", and length of string loop close serving: 6"
- Recurve Bottom Loop: 1-1/2"
- Recurve Top Loop: 1-3/4"
- Longbow Bottom Loop: 1"
- Longbow Top Loop: 1-1/2"
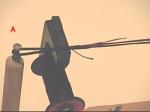
A finished loop.
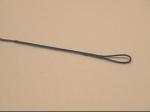
Although you can add the center serving on the string jig, it's always best (if possible) to serve that with the string braced right on the bow. You want a slight twist added to the string before bracing, perhaps one turn (twist) per 4 inches - you can add more later as the string stretches and/or needs to be shortened. Wax the string strands lightly, rubbing it in well. I like to add a tiny drop of CYA glue to all whipped serving ends. That's the basics of crafting an endless bowstring!
|
Some of my thoughts on endless string making: |
|
I usually use a 16 strand DF'97 tillering string to first set the brace height and the string length: I adjust the bowyer's knot to get a "comfortable" starting brace height, then measure the string (while braced on the bow) from loop end to loop end. I set my string jig posts for that precise length. The resulting string (no matter whether it's 450+ or B50) is gonna creep a bit - that inital creep is from the string "relaxing" at the served loops due to ultra slight inconsistancies in strand tension during spinning. This requires a bit of string twist to get'er back to the starting brace height. |
|
IDEALLY, there should be very little twist in an endless string. Why? Because it's not necessary! Unlike Flemish, endless string twists don't hold the string together. This is GOOD, because twists add "spring", which can add inconsistancy to your shooting. If I've got too many twists in a string, I use the old string (twisted short) to make up a new, shorter string (what's "too many twists"? - for me, that's when the endless string starts looking like a Flemish string, our about a twist in every 3" or so - this will vary with string length and number of strands; after awhile, you can just eyeball the string and know). |
|
Most archers do NOT feel comfortable shooting an endless string with just a few twists, so to make them "happy" I recommend one twist per 4" of string, or about a dozen+ twists per string. You'll find most Olympic archers get by with maybe 3 to 5 twists on a brandy new string, and maybe add another 3 to 5 as the string gets "broken in" (now there's an oxymoron if I ever saw one!). I like to add enough twists to take out the flat, ribbon-like look of a new untwisted string. |
| Have Fun! |
© 1999 - R.F. DiStefano
Rob DiStefano has been involved
in archery since the mid 1950’s
when his Dad got him started in
shooting, and crafting bowstrings,
arrows, and quivers. A very active
NAA and NFAA competitive tournament
archer through the 60’s
and 70’s, he started the Pelham
Archers archery club that held outdoor
NFAA field and NAA target tournaments at their own large
New York City chartered outdoor range. The club participated
with other archery clubs in NY/NJ/CT tri-state archery tournaments.
Today, Rob is a consultant in the telecommunications
industry and enjoys the revival of traditional archery—shooting
longbows for target and roving fun, and offering his Custom
Endless Bowstrings.