 |
The Archival Archery Bowstring Jig
Quick and Simple Collapsible Recurve Bowstring Jig by A.Ron Carmichael
TABLE OF ALL PICTURES
Back to Documents Index
This bow jig is based on the original design by Rob DiStefano, and enhanced by Trad Coop. I further adapted things to make it as economical as I could yet also make it easier to assemble, store and transport. Note that where I used hinges, you can get specific joints that are higher quality, made to spec just for these metal channel rails, from the same source as the rails. Thanks to Steve Marzec for that tip.
Backbone:
The metal channel recommended by Trad Coop was a great idea that I had been
searching for a long time. I
found it at the local Austin Electrical Supply house as a 10 foot section.
It comes in two flavors - one with holes punched in the back, and without.
I chose the one with holes to cut down on weight but either will work equally
well.
Mounting Block:
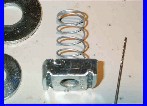 |
The channel has designed for it a mounting block that fits
inside of it very nicely. Easily removed and installed, the block comes
with a spring if you want, and with a 1/2" threaded hole through it. It's
shape is such that you can insert the block, rotate it 90 degrees, and it wedges
itself into the channel very nicely. Available from the same source as the
channel itself.
Length:
Bow Strings for a standard Olympic style recurve bow with
a 25" riser and LONG limbs need to be around 70 inches long, so the jig has to
be able to accommodate this length. I could easily cut the channel down
from 10 feet to 6 feet (72 inches) and be able to make strings. But
if I cut the channel into two equal 5 foot lengths (60 inches) then I can make
TWO jigs but will need roughly 12 more inches of length per jig somehow.
That is easily acquired by making sure that the pivoting arm is such that when
installed it makes the string up to 72 inches long.
The height of the posts:
The posts need to be tall enough to put hands
and string winding jigs over and under the bowstring easily and rigid enough to
not flex at all when put under slight tension by drawing the strings taut.
If they flex then the string length is subject to change and the individual
strands will not be evenly tensioned. 1/2 inch thick bolts make a very
good, rigid post, especially if use with the mounting blocks mentioned above.
6" long bolts work well for the fixed single arm string post, 4 1/2" for
the pivot arm string posts, and a 3" or so long bolt makes a
good pivot point for the pivot arm.
Thickness of the Posts:
I chose to use the 1/2" bolt because it matched the opening in the
spring blocks. It is probably overkill in terms of strength needed to keep
from flexing too much when serving the string. Rob DiStefano, maker of
countless bowstrings, prefers to make one loop very small and points out that
when the vinyl is added to the already large diametered post, it becomes
difficult to serve a small loop. The post of 1/2 " will force a loop
of more than 1 1/2 " circumference. If this is too large then it is
possible to get a brass insert for the spring block to reduce the diameter -
switch to a 1/4" bolt, for example, to make a circumference of about 3/4", which
should enable you to make 1" loops easily. Instead of vinyl, get a
can of liquid plastic, found in the paint section, which comes in colors.
You dip a tool handle OR A BOLT in it, will coat the threads with a thin
protective layer. If the layer is too thin, dip again after it has cured
to double the layer. This might be very good for bowstring making -
someone try it and let me know. A can runs around 6 dollars, I believe.
 Rob
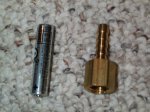
DiStefano mentioned to me that the 1/2" bolts causes
too large of a loop for some people. In such cases, it is easy to add a
brass FEMALE HOSE BARB, 1/4 inch Inside Diameter
Hose by 1/4 inch Female Pipe Thread, to the tip of the bolt. The threads
may not match perfectly, but the barb will be fixed well enough for use as a
string guide. I found these barbs at Home Depot near the clear vinyl hoses
on the plumbing aisle.
Hinge:
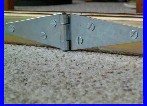
I wanted to be able to fold the whole jig up as much as
possible. From a 5 foot long length, putting a hinge on the channel and
then cutting it apart and remounting the hinge lets me break the maximum length
down to HALF of that - 30 inches or so, which happens to be the length I chose
for the pivot arm.
Latch: To keep the channel aligned and straight at the hinged joint, I chose a latch that is light-weight but should hold the jig straight at the hinge. Note that you can also get an insert from the electrical supply depot designed to join two pieces, that MAY be a more elegant and straight, rigid option.
Surface of the posts:
The threads of the bolts remain rough and
crude. They are difficult to handle, although the threads are good in that
they spread the strands of the bowstring out evenly as you wrap them.
However, it spreads them too far and makes it hard to combine them when you are
ready to start serving(wrapping) them. I chose to slide some
clear vinyl hose (1/2" inside diameter) lengths over the bolts to up to around
an inch from the tops. I then used a 3/8" vinyl hose, heated in boiling
water, and slid over the bolt. This makes the vinyl very tight.
The joint between the two hoses makes a good pinching point to anchor the start
and end of the string at the beginning of the string-making process.
Tightening bolts:
I chose LARGE wing nuts (one of my favorite
descriptive monikers) for the bolts to reduce the need for tools in setting the
jig up and adjusting it. I had access to a bolt company right on the way
to the electrical company and so bought these but should also be available at a
typical Home Depot or Lowes.
Washers:
Washers are useful to help maintain alignments and make
turning the pivot arm more easily without loosening it so much that it causes
variability in tightness of the string. The 2" washer provides a flat
surface on top of the channel and the 1 3/4" provides distribution of the
pressure on the boards' surface.
Pivot Arm:
I chose red oak for it's strength(density) and convenience. In
other words, they had some at the store and I didn't want pine (too soft).
In order to regain the length needed that was lost in cutting the channel at 5
feet, I chose to make the pivot arm 30 inches long.
Parts Sufficient to make TWO JIGS:
| Quantity | Description | price each | total price |
| 2 | 1x3x32 red oak boards (64" actual total length) | 1.29/foot | 6.45 |
| 1 | B-Line B22SHYZN 1 1/2 12 GA STR (channel) | 11.40 | 11.40 |
| 4 | B-Line N-225 1/2 Spring Nut (the springs are not required) | 0.49 | 1.98 |
| 4 | 1/2-13 x 6" tap bolt gr 5 plated | 0.84 | 5.04 |
| 2 | 1/2-13 x 4 1/2" tap bolt gr 5 plated | 0.60 | 1.20 |
| 2 | 1/2-13 x 2 1/2" tap bolt gr 5 plated | 0.39 | 0.39 |
| 8 | 1/2-13 WIng Nut Plated | 0.57 | 4.56 |
| 6 | 1/2 flat washer plated (1 3/4 inch wide) | 0.674 | 0.40 |
| 2 | 3/4 flat washer plated (2 inch wide) | 0.39 | 0.78 |
| 4 | 1 foot vinyl 1/2" ID | 0.29 | 1.16 |
| 1 | 1 foot vinyl 3/8" ID | 0.29 | 0.29 |
| 6 | Brass Female Hose Barb 1/4" ID Hose x 1/4" Female Pipe Thread (this is to make smaller loops if desired) | 1.28 | 7.68 |
| OPTIONAL HINGE: | only needed if you make the channel collapsible | ||
| 2 | Heavy Strap Hinge 4" | 1.42 | 2.84 |
| 2 | 2-3/4 Spring Draw Hasp Latch | 2.88 | 5.76 |
| 1 | 8-32x1/2 Flat Head Machine Screws(bag of 10) includes nuts | 0.83 | 0.83 |
| 1 | 10-32x3/4 Flat Head Machine Screws (bag of 10) includes nuts | 0.83 | 0.83 |
| 1 | #10 medium split lock washers (bag of 50) | 0.83 | 0.83 |
| Each jig costs $26.21 | $52.42 |
(The last three items leave you with a few extra screws, loose as well as extra nuts...) NOTE: the dimension of the board is described at Home Depot as "1x3" but is NOT really 1" thick nor is it 3" wide - it is more like 3/4" thick and 2 1/2" wide. That's not a problem as long as you measure the middle accurately. Select flat, clear (no knots) and straight wood for this. It comes in 8 or 10 foot long sections and you can have them cut exactly the length desired at no additional charge.
Tools Used:
I used an old decrepit electric drill with a socket wrench adapter so that I could rapidly turn the bolts while holding the wing nut still in my hand - saved a lot of time and effort to twirl the nut 4 or 5 inches. Also needed to drill the pivot arm.
Drill Bits: I used forstner bits but spade blades are also usable. Sizes: 1/16" (pilot holes) , 1/2" , and 1 1/8 ", and a metal cutting drill bit of 3/8" diameter.
The 1/2" bolt's head requires a 3/4" socket wrench to drive it.
A hack saw, or if lazy (moi) use a cutting wheel on a 7 1/4" circular saw, to cut the channel into either quarters (for two jigs) or once at 70 inches & 50 inches.
Assorted: Tape Measure, duct tape or masking tape, pencil, marker pen to write on metal with, right angle "L" (measuring device), hammer, a punch or nail, a monkey wrench to hold the spring nut (block) while the drill turns the bolts, silicone bumpers (found in cabinet section of hardware store).
That's it.
METHOD:
Channel first: If you do not want to make two jigs (one would be donated to your archery club, of course<G>) then you will need to adjust what I am about to write, accordingly. Likewise if you do not want to reduce the storage size of the jig, dispense with the hinge, hasp, and machine screws.
1. The Channel - Cut the channel at the desired length. I cut the 120" channel into four 30 inch lengths. Two pieces will be needed for each jig.
It is important that no job in A be conducted or completed without use of either bailing wire or duct tape. I haven't been able to figure a use for bailing wire on this project. Therefore, duct tape the two channel pieces together end to end as though they hadn't been cut, right up against each other with no space between, with the open side of the channel UP. You will mount the hinge to one side of the channel and the hasp to the opposite so that the channel can be folded in half for storage - it doesn't matter which side the hinge/hasp are on.
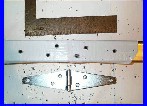 |
It is important that the channels be aligned straight when in the extended
and locked position. Hold the hasp hinge to one side of the channel using
tape if necessary to hold it securely in place. The center of the pin of
the hinge should be aligned with the seam of the two pieces of the channel.
There must be NO gap between the two pieces of the channel. Mark the screw
hole positions through the hinge's screw holes onto the side of the channel
using the marker to write on the duct tape. After the hinge and hasp are
both mounted you can easily unscrew the bolts and remove the tape and reinstall
the hinge. Use the 3/8" metal drill bit to make the screw
holes through the channel on one side only. My hinge came with 3 holes on
each strap.
 Mount the just one side of the
hinge securely using the 10-32 by 3/4 inch machine screws, lock washers, and
nuts, leaving the two pieces taped together still. The nuts and lock
washer go to the INSIDE of the channel with the screws penetrating from the
outside in. Now carefully drill one hole on the opposite side of the
joint for one of the mounting holes on the hinge. If you err, you want it
(the hole) to be slightly farther from the joint rather than too close, so that
the two pieces are drawn together instead of forced apart. Accuracy counts
here.
Install a screw in that first hole and check your accuracy - are the two channel sides snug against each other? If not, you can remove the screw, and enlarge that hole in the channel with a larger drill bit so that when you tighten the screw you have room to adjust. Once you have this first screw set and tightened and it is holding the channel at just the right distance, drill the other two screw holes and finish mounting the hinge. Use the lock washers, and tighten all six screws well.
Now go to the other side of the channel, opposite of the hinge, to mount the clasp.
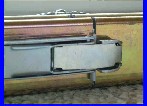 |
It has a spring nature, so it should be mounted according to the directions on the package so that it ends up under tension. It is important again that the two pieces of the channel are nestled flush against each other. Once mounted using the 8-32 x 1/2" machine screws, lock washers, and nuts, you can disassemble the hinge and latch, remove the tape under the hinge and remount the hardware. Situate the hasp so that it is in the approximate middle of the channel, top to bottom.
The two channels should be very close to straight in line when the hasp is closed. You may need to put some tape or a bit of silicone caulk in the joint to align or eliminate gap so there is not "give" or "wiggle factor" that might cause variability in your strings. It's ok to have a little crookedness as long as it doesn't move while you make strings.
2. The Pivot Arm - The 1 inch by 3 inch red oak board is cut to 32" at the
Home Depot, one for each jig. Be sure to select for straight, flat boards with no knots or defects. Red oak is usually very good for
this type of use.
Accuracy is important for making the pivot arm so that strings will be consistent. Find the very center of the board when viewing from above the board. See picture for perspective.
 |
Mark the center with a pencil. The axiom, "Measure twice, cut once" is important to follow. Use the nail/punch and a hammer to tap an indentation precisely on center. This dent becomes the guide for the pilot drill bit to follow, and insures that the tip of the drill will not wander off mark.
Use the 1/16" drill bit to drill a pilot hole through the 1 inch thickness of the board. Try to make it perfectly perpendicular - if you have a drill press this is the best way to drill the holes, of course.
Once you have the pilot hole drilled, verify you are in the dead center of the board across the 3" width by measuring again. (well, it is actually more like 2 1/2" than 3", but in the spirit of American marketing they still call it 3") If you screwed up, you can try again since the drill is only 1/16 of an inch by moving to one side or the other of the LONG dimension by slightly more than 1/16 of an inch. It is more important at this step to be correct across the 3" width than the long distance (32"), because in the next step we will make our measurements from the center point rather than the ends of the board, to insure accuracy when the pivot arm is rotated in any direction. Once you have the center made, mark the edges of the board on each side of the hole across the 3" width - this will help later when using the jig, to mark the center of the bowstring for loop serving.

|
Measure the distance from the pivot hole to each long edge. You are going to place a post at each end, approximately 1 1/2 inches from the end of the board. If the posts are too close to the ends you risk splitting the board. Assuming you have a 32" long board, the string posts's center holes will be about 14 1/2 inches (32 / 2 = 16 , minus 1 1/2 inches = 14 1/2 inches). MARK this point at the midpoint of the width (3 inch) at the appropriate distance from the center point. Verify and re-verify the distance of the pencil mark. Imprint it with a punch and the hammer, then drill it with the 1/16 bit. Keep the drill bit straight up from the board at a 90 angle to the surface. This is the most important drill - sloppy here is sloppy later. Again verify the distance from the center hole for both sides. In theory: 60 inches of channel length plus 14.5 inches of board minus 1 inch lost due to the width of the spring blocks, leaves you able to make bow strings of up to 73 1/2 inches long.
NEXT, designate one side of the pivot arm board as top and the other side bottom.
The bolt needs to be countersunk from the underside (bottom) so that the head
does not extend beyond the surface of the bottom of the board or else it will not pivot cleanly
across the channel. If you do not countersink, you will need to add
at least 5 (FIVE) washers to the bolt under the board to raise the board up
enough to clear the channel. I assume you wish to countersink, it is easy to do.
If you have a forstner bit I will assume you know how to countersink just
enough. You say you have a spade bit and think countersink is where
you wash your dishes? OK, I'll go into more
detail then, you newbie you.
The spade drill bit has a triangular point that will self-center itself in the
pilot hole you made using the 1/16 drill bit. You are going to use the
large drill bit (1 1/8") starting from the bottom side. Do NOT drill the
hole at the center of the board, this center axis point does not need
countersinking! Drill just enough wood out so that the
head is flush with the surface of the bottom. When you tighten the bolts
down, the bolt will sink slightly BENEATH the surface, insuring adequate clearance.
Drill a small amount, test the depth, then drill slightly more. BE SURE to
stay perpendicular ( 90 degrees to the surface) so the bolts will be equidistant
during rotation of the pivot arm. Measure the wall of the hole at the four
compass points to check perpendicularity. Countersink the post hole at both ends of the board.![]()
Now switch from the 1 1/8" drill bit to the 1/2" bit. Start from the top of the board for this drilling. This will make the pathway for the bolts when inserted through the board from underneath. So drill from the top with the 1/2 " bit, using the 1/16 pilot holes, do all three holes. Drill the two outside holes slowly and gently to avoid splintering as the drill breaks through the bottom side. Drill all three holes (include the center hole) all the way through.
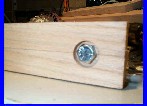 The 1/2" holes on each end should be very close to the center of the
countersunk holes, so that when you put the bolt through, the head can be held
using a 3/4" socket when you tighten the wing nuts later. If there is not
enough clearance, you can try using a razor blade to enlarge the countersunk
hole enough, you can get a new board and start over, or you can use enough
washers as spacers so that the pivot arm clears the channel when it is rotated.
3. End Post - This is the bolt that is not inserted into the wood, but rather mounted directly to the channel.
Take a 6" bolt and insert it into a spring block from the spring side of the block. If you use a drill with a socket to rotate the bolt, the process goes quickly and easily. Put a 1 3/4" washer on the bolt and then a wing nut, taking the nut down to about an inch within the spring block. This is the neat part. Hold the bolt by the threads - insert the block into the channel close to one end and rotate the block 90 degrees clockwise and then pull up on the bolt. You will see that the block's grooves slip into the channel's edges, keeping the block from rotating any further as you tighten the wing nut down onto the washer. Situate the spring block so that it is flush with the end of the channel and tighten it using the monkey wrench but do not over tighten. There should be NO wobble when you try to wiggle the top of the bolt.
 Take the vinyl 1/2" hose and slip it over the bolt and down to the wing nut.
Mark the hose about 1 inch from the top, then take it off the bolt and cut the
hose at the mark. Remount the hose on the bolt. Use the 3/8"
vinyl hose, cut 1 inch off, and drop it into some very hot (ie, boiling) water for a
few seconds. Fish it out of the water and quickly force it onto the top of
the bolt. As it cools it will shrink around the threads. If
you push down hard enough, the seam between the two sizes will acct as string
end keepers during use.
4. Assembling the pivot arm with bolts. You should insert
two 4 1/2" bolts from underneath so that the bolt heads are in the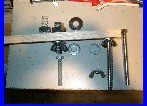 countersunk area. On the flip side (the top) put a 1 3/4 " washer and a
wing nut, drawing the nut tight so there is no play in the bolts.
Each of the two bolts needs the vinyl hose treatment like the single post.
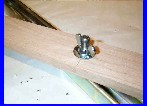
 Now insert a
3" bolt into a spring block from the spring side, compress
it all the way. Put a 2" washer on the bolt and then insert the bolt into
the wooden pivot arm from the bottom side. Put a 1 3/4" washer on the bolt and a
wing nut. Do not tighten yet. Insert the spring block into the
channel near the opposite end of the channel from the single post, rotate 90
degrees, and then finger tighten the wing nut.
5. Nearly done Things you can do to pretty it up some: Apply cork or silicone bumpers to the bottom of the channels so they do not scratch the dining room table. Big brownie points with the SWMBO. Take a file to all rough edges of the channel especially the edges you cut near the hinge. Mark the side of the channel starting at 64 inches through 73 inches so that you can easily set the pivot arm to the proper approximate length when you are setting up.
This finishes the construction of the Archival Archery Jig. Verify the distances from the various points. When you measure from the single post to either of the pivot arm posts (rotated in line with the channel) the distance should be identical.
Start making a string with the two movable posts in parallel with the bar, so that you can measure accurately the length of the string. For a LONG recurve bow (long limbs with 25" riser) I make the point to point distance to be a total of 67 1/4" and CAREFULLY use the same amount of tension for each circuit of the string around the posts.