Installing the Nock
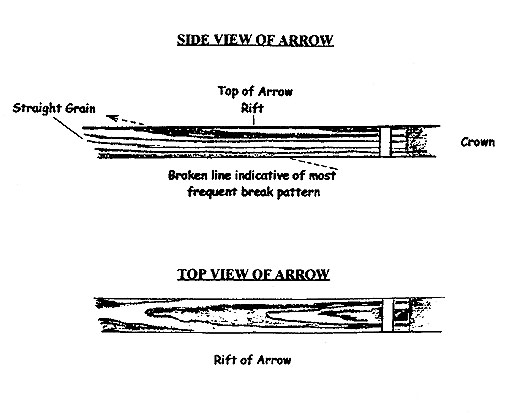
Nock alignment is one of the most important processes in arrow making. There is one and only one correct position for a nock in relation to the grain of the shaft. Firstly the nock should be aligned with the grain of the shaft (see photo) so that when it fits on the string, the grain side of the shaft should be against the sight window of the bow. In other words the grain should be horizontal, in the 3 o'clock and 9 o'clock positions. The rift of the shaft should be in the 12 o'clock and 6 o'clock positions. The rift on top, or 12 o'clock position, should be pointing forward towards the bow hand - (see illustration).
The importance of having the rift situated as described above is one of safety. You will notice that the rift on the bottom of the shaft runs in the opposite direction. The weakest point in the wood of the shaft is where the rift comes to a point. A split in the shaft usually starts at one of these rifts. Having the rift on top of the shaft pointing towards the bow ensures that, should the arrow splinter upon release of the string, the back end of the shaft will be directed upwards away from the bow hand. If the rift was the opposite way around the back end of the shaft would be directed downward and could cause serious injury to your bow hand. This is a good argument for using an indexed nock and three fletches. Both the index of the nock and the cock feather help you to easily identify which way the arrow should be placed on the bow string.
To attach the nock to the shaft, apply a small amount of glue to the nock taper and put the nock in place. Rotate it a couple of times to spread the glue. Align it with the grain (as above) and sight down the shaft and ensure that it is in alignment with the axis of the shaft as well. If it is put on crooked it can cause erratic flight. This is because the nock throat will not be dissecting the arrow. Therefore the string will be pushing unevenly to one side of the arrow.
